Friday, August 17, 2012

Shell Letters!

I've had the supplies for this project for months, but it's been one of those things that I kept putting on the back burner.  I finally got around to it yesterday, and I'm glad I did.  The finished product is pretty cool.  Perfect for the beach house I don't have!


I spray painted chipboard letters white and then used superglue to attach each shell.  It is very tedious work, but worth it in the end.  Make sure you wear gloves when using the superglue to prevent gluing your fingers together! I purchased the shells on ebay, but you can probably buy them a craft store, or, better yet, collect them from the beach!

These are for sale!

Thursday, August 16, 2012

A Mod Dresser gets an Update

I scored this 1950s mod style dresser from my friend Ryan.  It's a cool piece that I knew could be transformed with some paint and new hardware.


I decided to go pink with this one---a color I don't often choose, but I pictured this dresser with a new, girly vibe.

I primed this piece and then painted it with Martha Stewart latex paint in a color called Punch.   Next, I drilled holes where I wanted the new hardware to go.  For a long time I was scared of using a drill and would have my boyfriend or dad do this part, but it's actually very easy.  The hardest part is making sure you measure perfectly so that the holes are in a straight line.   I decided to place the new knobs 6 inches from the sides of the drawers, and halfway between the top and bottom of the drawers.  I made pencil marks and then chose the drill bit.

I just pick the drill bit that looks slightly larger than the hardware I'm using (very unscientific!)


Here is the finished dresser, with its new feminine look...


I love this hardware, it's a bunch of little flowers bunched together.  Very unique!


This one is now for sale.  It would look so cute in a nursery or little girl's room!
See "For Sale" section for details on purchasing.


Back in Action

It's been a while since I've posted anything, but I have an excuse--I've been in Ireland!
My sister and I had a fantastic time on the Emerald Isle, discovering long-lost relatives, taking in the scenery, and of course, visiting more than a few local pubs.


My sister Meghan on the left, and myself

Now that I'm home, it's back to painting.  I just picked up this absolutely fabulous, circa 1920s bedroom set.  It's a matching dresser, bureau with mirror and full size bed.  I'm in love!


Mirror on left attaches to this bureau


I'm planning to paint it off-white.  If anyone is interested in it as-is, without paint, send me an email!  I'll probably start painting this set next week.  I think it will look gorgeous.  Stay tuned....


Wednesday, August 1, 2012

Painting a Laminate Bathroom Vanity

There was nothing wrong with our bathroom vanity, but there was not much right about it either.  It does the job, but it's cheap, builder-grade laminate--nothing special.  Since buying a new one was out of the question, I decided to take my trusty paint brush and attempt to make it a little bit prettier...


Here are the steps I took to paint a laminate vanity:  (PS some people say you can't paint laminate, but I did a lot of research and found that you CAN!)

1) Remove the doors (this was really simple--take out 4 screws) and hardware.


2) Prime the doors and cabinet.  I used Zinsser B.I.N Primer, which, I have read, is the best on laminate. 
3) Paint the doors and cabinet (I used a brush, but a roller might be easier.)  I used Glidden semi-gloss latex paint.  It took 3 coats to cover completely. 
4) Protective coat--I still haven't done it, but I'm planning to spray on a polycrylic.  
5) Reattach hardware and doors.

The whole process took an afternoon to complete--not bad at all. 

Here is the vanity after it's paint job...
I like the contrast of the darker bottom and white sink.  Might have to paint the medicine cabinet the same color.  Overkill???

Next project: replace the faucet!


Sunday, July 29, 2012

Not Your Average Coffee Table

I picked up this coffee table with leather top at a consignment shop recently.  I've been wanting to try another Mod Podge (decoupage) project after doing this side table.
I  figured I'd Mod Podge the leather top...


I decided to use old sheet music to cover the leather, mostly because I think it's beautiful, but also because I've seen other bloggers doing really cool things with sheet music, such as....

Miss Mustard Seed
Miss Mustard Seed


 I used a small paintbrush to put a thick coat of Mod Podge directly onto the leather, as well as both sides of the sheet music, before smoothing it onto the top of the table.  It's kind of impossible to smooth out every last air bubble, but I have found that you can poke them with a needle to "pop" the bubbles once dried.  The Mod Podge dries to a smooth, hard finish.  It's a pretty cool product.

Here's the finished table...definitely not your average table, but very cool, nonetheless.


See "For Sale" section for detail on buying.

Friday, July 27, 2012

A Sweet Little Entryway Table

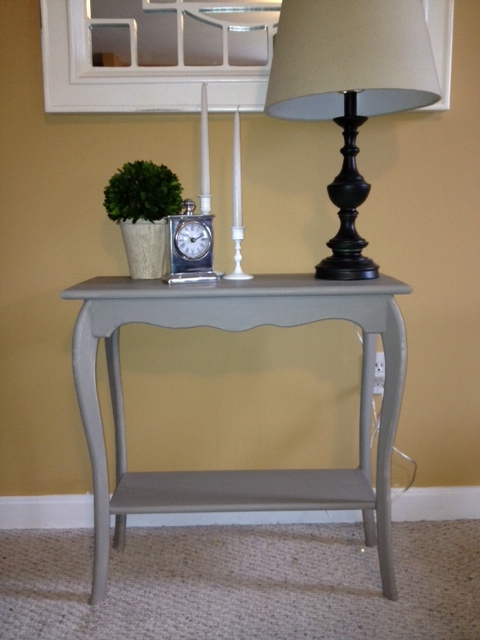
This unfinished, console/entry table looked sad and pretty boring when I found it at a consignment store.  The shape of the table was very pretty, however, and I knew it would look nice all dressed up with some paint.


After some primer, paint, sanding, and waxing, she is a more glamorous version of her former self.
It's a very simple table, but I think it would look elegant in an entryway, or behind a sofa.


See "For Sale" section for details on purchasing!

Monday, July 23, 2012

Sister Side Tables

I found these coordinating side tables at two different yard sales.  When I saw the second one, I couldn't believe how similar it was to the one I had found the week before.  They were exactly the same price.  They aren't identical but they coordinate so well.  Long long sisters!


The first step was to clean them really well.  Next, I painted them with two coats of chalk paint.  I had to fill the holes left by the old hardware, as it was in bad condition and I wanted to use new hardware that only needed one hole. 

I bought some Gold Leaf paint a while back and decided that it would work well on these tables.
Here they are after chalk paint, gold leaf paint on the raised details, and some distressing with sandpaper...


I liked them like this, but I wanted them to have more of an aged, worn look (some people probably think this is crazy, but I like it!)  I decided to experiment with some glaze.  I brushed on the glaze (you buy it at a hardware store and mix it with whatever paint color you choose) and then wiped most of it off with a damp rag.  It leaves you with an aged patina.

Can you see the difference in the finish?  In the photo on the left, the tables have been glazed...


Here are some more photos of the finished product...


I painted the hardware with the same gold leaf paint.  I think this gold leaf stuff is my new obsession...


I love these side tables.  I kind of want to keep them for myself but I've got to resist the temptation!
The color is hard to describe.  They were off-white but the glaze tinged them a soft green color, but I wouldn't call them GREEN..if that makes sense??

They are definitely very pretty.  Check out the For Sale section for details on buying them!